Pages

Tuesday, 23 June 2015

Recipe: Zucchine Flower Frittelle. Courgette flower fritters.


Courgette flower fritters


Today's recipe is: Zucchine flower fritters.

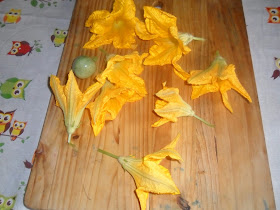
courgette flowers

  Some nice fresh flowers picked this morning. They go limp very quickly.

Courgette flower

how to prepare zucchine flowers

I prepare the flowers like this and then rinse them.

Courgette flowers ready

rinsed courgette flowers


frozen courgette flowers

When I have a lot I freeze them like this and keep for use through the year. 

cooking courgette flowers

You need:
Fresh (or frozen) zucchine (courgettes) flowers.
Optional small zucchina.(courgette)
1 egg per person.
Flour: About 2 tablespoons per egg.
Freshly ground parmesan cheese: 2  tablespoons per egg.
Parsley: A small amount.
Salt to taste.
Olive oil for frying. (Or other preferred cooking oil )


cut courgette flowers

Cut the flowers into small pieces.


Add the cheese, parsley and salt to taste.

sliced small courgette

If you have some small courgettes you can add a finely sliced one if you like.

courgette batter

                                                                    Mix together.

Making batter for frittelle

Add the flour and eggs.

courgette batter

                         The mixture should look like this. A semi-liquid consistency like batter.

natural olive oil

Heat some oil in a frying pan. I use our own home produced olive oil.


Spoon in the zucchine batter. I add about 2-3 tablespoons mixture for each one, but you can make them smaller.

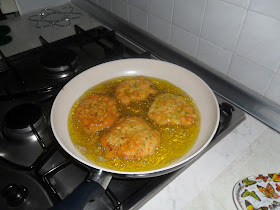
frying courgette fritters

Fry until a golden colour turning when cooked on the bottom.

cooked courgette fritters.

I usually turn a couple of times until cooked.


Take out and drain on some kitchen paper.

courgette fritters ready

Ready to eat! I found it difficult to prevent my husband from eating them all before I took a photo!

drying origano

This is wild origano (oregano in English)  which my DH gathered. Isn't it pretty?

origano for pizza!

We dry it to use for pizza and many other recipes!

By the way I would love to hear from you if you try this recipe!

Monday, 22 June 2015

DIY Snag Free Knitting Stitch Markers


     Today I was working on a knitting project for a doll and needed some stitch markers. As I was using size 2.5mm needles I decided to make some small ones so they were the right size.

DIY stitch markers


    Although I have seen some very pretty ones around, I hate those dangling ones that seem to get caught up in the yarn all the time. If I am using fine yarn I don't want to risk it breaking because it gets tangled in the stitch marker! They also seem to reduce my knitting speed.I like them to be as simple as possible.

      I often just use those little plastic rings that are used on some bras, but the ones I had around were slightly bigger than I wanted. So I picked out some jewellery jump-rings and chose some small beads which had the hole of about the same size as the wire. I don't like to use big beads because they take up space inside the ring. Small beads look pretty and are functional.

     If you don't have any jump-rings the size you need  you can just use some fairly thick jewellery wire, cutting it to the size you wish. Long-nosed pliers like the ones I used make it easy to shape it into a circle. You can also use a bigger size knitting needle to give it the right form. Remember that the stitch marker needs to be slightly bigger than the needle you are using so you can easily slip it from one needle to the other while knitting. Too big can be awkward and stretch  fine yarn.


DIY stitch marker

     So here I picked out some jewellery jump-rings and chose some small beads which had the hole of about the same size as the wire. With a pair of long-nose pliers I opened the ring.

Diy stitch marker

I placed a bead on one end of the wire pushing it almost fully on.

Diy stitch markers

I then bent the wire back into position. putting the open side of the wire into the bead and pulling the bead over the join. I actually used 2 pairs of pliers to do this as I found it easier to grasp and push the wire into shape.
How to make your own stitch marker

Here is the finished little ring. Looks cute doesn't it? Looks like a dolly ring!


DIY stitch-marker

     Here I placed the stitch markers on the needle as I started the pattern. If you use different colour beads you can mark different parts.

     You may have noticed that I do not glue the beads into place on the wire. If they are a fairly snug fit they do not slip around but stay in their place. Although personally it has never happened to me, if you do knit them into your work by mistake, it would be easy to pull them open and take them out without damaging the knitting! If they are glued you can't do that so easily.
I have been making these for years and they have never come open while knitting.

     They are quick and very cheap to make.

Diy stitch marker

I would love to know what you think about my method of making these with no glue. 

Saturday, 20 June 2015

Midsummer

Summer Solsice


 The night between the 20th and the 21st of June is the Summer Solstice, the shortest night of the year, the longest day when the sun seems to stop still in the sky. (Sol stat)
    
 In ancient times this was called Litha or MidSummer.
It is the time when Nature's beauty is at its peak. Gardens and fields are full of flowers and the trees are laden with ripening fruit.
In Celtic traditions great fires were lit and there was music and dancing. The festivities lasted all night with tambourines and ritual dances.
Animals were blessed by taking them between the fires. The higher the flames danced and the richer the harvest would be. The ashes were saved to bless the fields or to use to ward away the evil eye and bring prosperity and fortune.
Litha was also the time when the wisewomen would gather the medicinal herbs to use throughout the year. Verbena, sage, rosemary and thyme were among those gathered in the early morning when the dew was still on the ground.
The verbena was once woven into garlands, then  dried and hung to protect the house.
There are still some places in Italy where festivals are held and fires are are lit, but here in the village they no longer celebrate. I'll be thinking of all my friends around the world who still celebrate Midsummer!
This photo was taken on Midsummer's night a few years ago. To me it evokes all the beauty of the Summer Solstice.
Now I'll go and find my copy of William Shakespeare's " A Midsummers Night's Dream" !
Seems a suitable book to read this evening!


Thursday, 18 June 2015

Recipe: Pasta with Artichokes - pasta con carciofi.


Recipe pasta with artichokes

 Today I am writing about something a little different! How I make pasta with artichokes.
It is very quick and easy to prepare this meal.

Today I used some frozen ones but when it is the correct season I will show you how I prepare them for freezing.

Ingedients: I used amounts for 3 people, but you can add more pasta if you wish.

 I used 5 "carciofi", cut into quarters. More than enough for 3 people.
Some beef or vegetable stock. (you can use a stock cube if you don't have home made stock available)
Parsley.
Some bread crumbs. ( a few tablespoons)
Freshly ground parmesan cheese. (3-4 tablespoons or as desired.)
Olive oil. ( 2 tablespoons)
300g pasta. (100g per portion.You can increase this)
A pan of boiling water with salt for cooking the pasta.


                                                I turn my oven onto its highest setting.


I put the artichokes, stock and a small amount of parsley in the baking pan on top of the hob and cook until the artichokes are tender. 

       
The breadcrumbs and parmesan cheese are ready to add. I don't weigh them, a few tablespoons as shown.


Cook until tender. About 10 mins is usually sufficient.


                                       When they are tender add some breadcrumbs. Stir.

                                 
                            Add the parmesan cheese. If it becomes too thick add a little water.


Add a small amount of olive oil. About 2 tablespoons.


Stir again and place in oven.


                                       While this is cooking boil the water to cook the pasta.


Weigh the pasta and add to the boiling water. This pasta cooks in about 12 mins. I add salt as it starts boiling. When it is cooked, drain and replace in the pan


After about 20 mins in the oven the artichokes are ready. A nice golden brown colour. Add them to the pasta.


                                    Here I was adding the artichokes.


                                      There are enough artichokes left for another serving.


Serve the pasta with the  artichokes.


Buon appetito!


A wise owl!


I hope you enjoy making this! I would love to hear what you think!