Showing posts with label 18” Dolls. Show all posts

Thursday, 23 July 2020

Elizabeth's shawl.

Yellow shawl pattern.


I found an old note from my Mother while reading old letters. She had written these instructions which are from a Patons and Baldwins Woolcraft magazine it seems. 16th edition she wrote on it.


I am curious to know what the original design was for. The only version I have found online is the 9th which does not have this stitch pattern in it.
I think it is one of the most difficult stitch patterns I have done. It has patterning on both sides with a lot of purl 2 together through back loop! Not my favourite stitch to do but I love the effect. The pattern repeat is 19 with an extra 14sts.
I am using it for a doll shawl border. I can’t imagine making anything big from it.
A Ravelry friend found and sent me a photo from the book. It seems it was from a selection of knitting stitches in the booklet not a pattern.


So here is my version of this thing! 
Using cobweb weight yarn and size 2mm needles cast on 153sts. 

Knit first and last 3sts on all rows for border.

1: K2 *K1, (wf, k2tog tbl)x3, k3, wf, k3, k3tog, k3, wf, repeat from * to last 12 sts, k1, (wf, k2tog tbl)x3, k5.

2: P4, (p2tog tbl, wrn)x3, p2, *p1, wrn, p2, p3tog, p2, wrn, p3, (p2tog tbl, wrn)x3, p2, repeat from * to last 2sts, p2.

3: K2 *K3, (wf, k2tog tbl)x3, k3, wf, k1, k3tog, k1, wf, k2, repeat from * to last 12 sts, k3, (wf, k2tog tbl)x3, k3.

4: P2, (p2tog tbl, wrn)x3, p4, *p3, wrn, p3tog, wrn, p3, (p2tog tbl, wrn)x3, p4, repeat from * to last 2sts, p2.

5: K2 *K3, (k2tog,wf)x3, k1, wf, k3, k3tog, k3, wf, repeat from * to last 12 sts, k3, (k2tog, wf)x3, k3.

6: P4, (wrn,p2tog)x3, p2,*p1, wrn, p2, p3tog, p2, wrn, p3 (wrn, p2tog)x3, p2, repeat from * to last 2sts, p2.


7: K2 *K1, (k2tog,wf)x3, k5, wf, k1, k3tog, k1, wf, k2, repeat from * to last 12 sts, k1, (k2tog, wf)x3, k5.

8: P6(wrn,p2tog)x3, *p3, wrn, p3tog, wrn, p7 (wrn, p2tog)x3; repeat from * to last 2sts, p2.


(There are 7 repeats of 19sts plus 14sts plus 3sts at each side for border= 153sts)


24 rows pattern. 


Change to garter stitch and shaping. 
1: K79, pm on left hand needle, turn. (You will have sts unworked on this row and the following rows.) 
2: (ws): k5, pm on left hand needle, turn. Center 5 sts are now “framed” with st markers. 
3: (rs): K to marker, remove marker, k5, pm on left hand needle, turn. 
4: (ws): K to marker, remove marker, k5, pm on left hand needle, turn. 
Rep Rows 3 – 4 until you have 3 sts on each end of work between needle tip and marker. 
Last rs row: K to marker, remove marker, k3. 
Last ws row: K to marker, remove marker, k3.)

Bind off all stitches loosely.


Enjoy! Let me know what you think of this!

Sunday, 22 September 2019

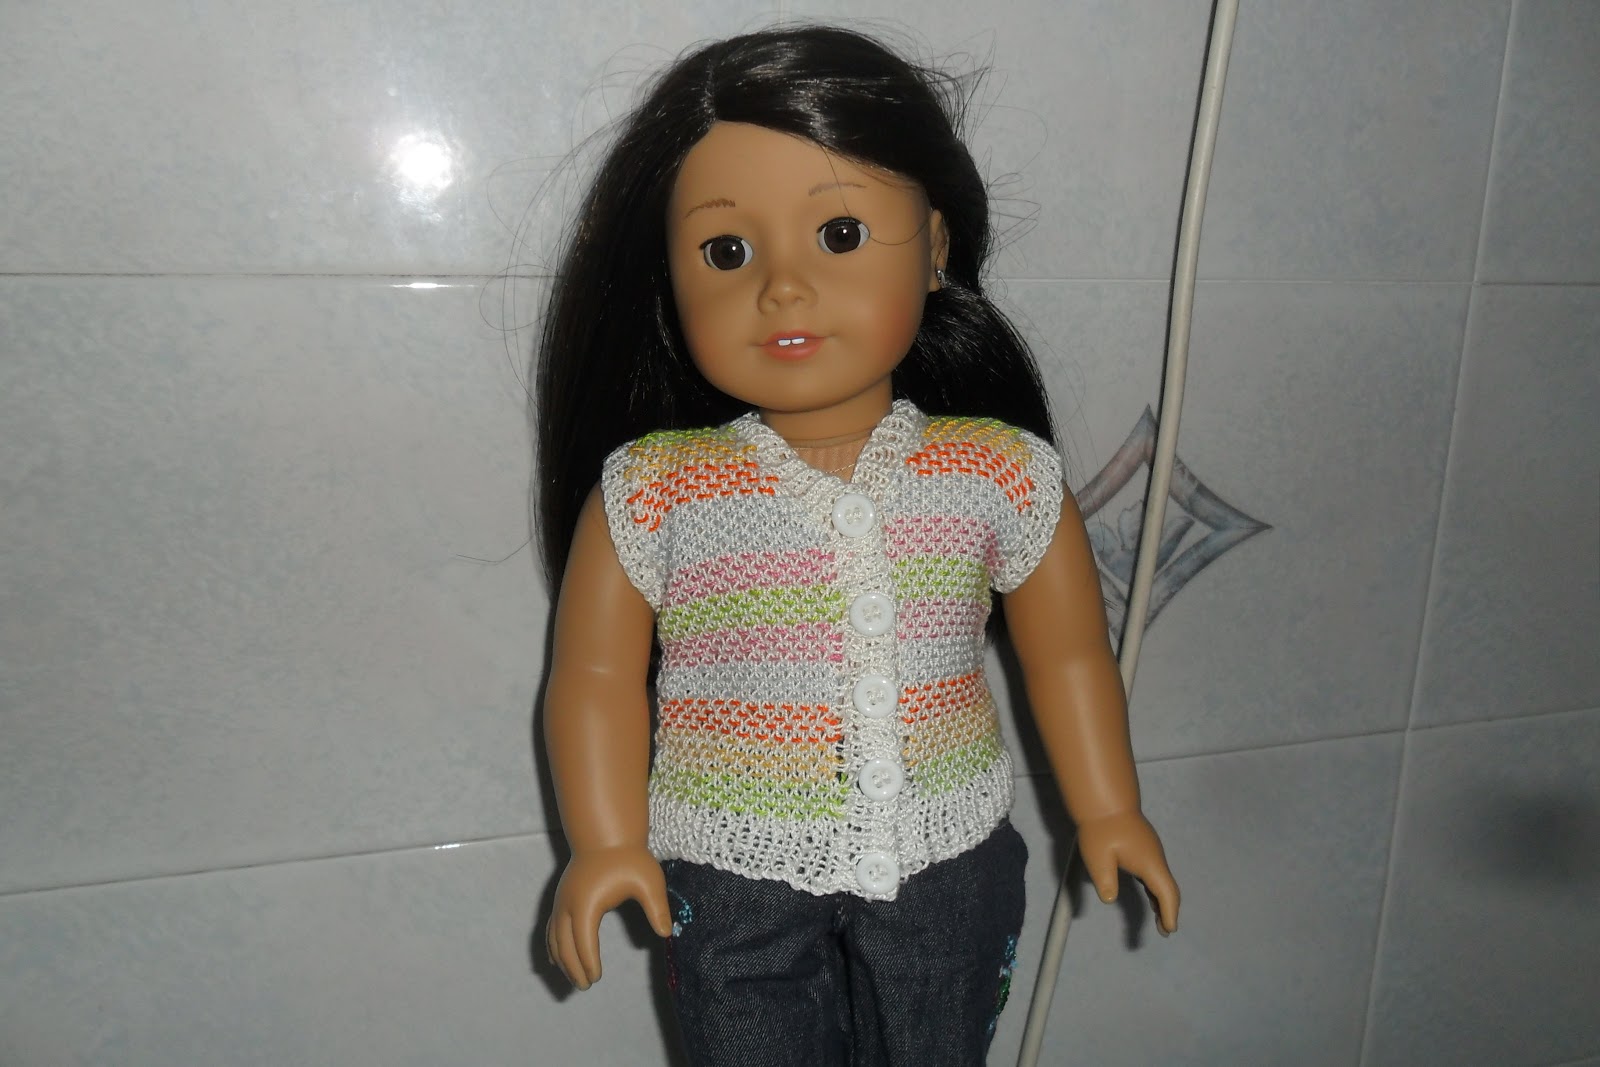
Swedish weave cardi for AG dolls.


Swedish Weave Cardi:


Free knitting pattern


Notions:
Size 5 weight cotton yarn.
Colour A.
Colour B.


Needles: US 2/2.5 mm. (or those you need to obtain gauge)
Darning needle.
Stitch markers or waste yarn.
small button .

Difficulty: Intermediate.

Gauge: 6 sts x 7 rows = 1 inch. In stockinette stitch.


Abbreviations

MC: Main colour yarn.

CA: Colour “A” yarn.

Use different colour contrast yarns as desired or a variegated one 

gives a lovely effect but lots of yarn ends to sew!


18" doll pattern


Co: cast on.

Bo: bind off.

K: knit

P: purl

St-stitch: Sts- stitches

K2 tog: Knit two stitches together as one stitch.

Ssk: Slip, slip, knit, slip 2 stitches and knit them together.

Yo: yarn over

kfb: Knit into front and then back of stitch.


Instructions:


Co 51 sts in MC. 

1: K1, p1; repeat to last st, k1.

2: P1, k1: repeat to last st, p1.

3-6: As rows 1-2.

7: As row 1.

8: Purl one row.

Start pattern:

1: K1, K1, MC, passing CA strand across st at front of work. *pass CA 

strand to back between needles and knit next MC st with CA at back; 

pass CA strand to front between needles and knit next MC stitch 

with CA in front; repeat to last st, k1.

You are not knitting with CA yarn but weaving it back and forth while 

working the MC sts.

2: K1, p1 MC st and bring CA strand forward to pass in front of purl 

stitch (on wrong side of work), *pass CA strand to back between 

needles and purl next MC st with CA in back; pass CA strand to front 

between needles and purl next MC stitch with CA in front. Continue 

to last st, k1.

You are weaving CA yarn between the stiches without ever knitting it.

3-28: repeat rows 1-2. (or to desired length to arms. Changing contrast colour every 4 rows.

29: Bo 3 sts, continue in weave pattern being careful to keep the order correct.

30: Bo 3sts, work purl row of weave pattern.

31: K1, ssk, work knit row weave pattern to last 3sts, k2 tog, k1.

32: K1, work purl row of weave pattern to last stitch, k1.

33: K1, ssk, work knit row weave pattern to last 3 sts, k2tog, k1.

34: As row 32.

35-44: Work in pattern.

Free knitting pattern


Left Front:

Cast on 25 sts.

1: K1, p1; repeat to last st, k1.

2: P1, k1: repeat to last st, p1.

3-6: As rows 1-2.

7: As row 1.

8: Purl one row.

Start pattern:

1: K1, K1, MC, passing CA strand across st at front of work. *pass CA 

strand to back between needles and knit next MC st with CA at back; 

pass CA strand to front between needles and knit next MC stitch with 

CA in front; repeat to last st, k1.

You are not knitting with CA yarn but weaving it back and forth while 

working the MC sts.

2: K1, p1 MC st and bring CA strand forward to pass in front of purl 

stitch (on wrong side of work), *pass CA strand to back between 

needles and purl next MC st with CA in back; pass CA strand to front 

between needles and purl next MC stitch with CA in front. Continue 

to last st, k1.

3-28: repeat rows 1-2.

29: Bo 3 sts, continue in weave pattern being careful to keep the order 

correct.

30: Work purl row weave pattern.

31: K1, ssk, work in pattern to last 3sts, k2tog, k1.

32: As row 30.

33:-34: As rows 31-32.

35: Work weave pattern to last 3 sts, k2tog, k1.

36: As row 30.

37-44: As rows 35-36.

Bind off.

Free knitting pattern
Right Front:

Cast on 25 sts.

1: K1, p1; repeat to last st, k1.

2: P1, k1: repeat to last st, p1.

3-6: As rows 1-2.

7: As row 1.

8: Purl one row.

Start pattern:

1: K1, K1, MC, passing CA strand across st at front of work. *pass CA 

strand to back between needles and knit next MC st with CA at back; 

pass CA strand to front between needles and knit next MC stitch with 

CA in front; repeat to last st, k1.

You are not knitting with CA yarn but weaving it back and forth while 

working the MC sts.

2: K1, p1 MC st and bring CA strand forward to pass in front of purl 

stitch (on wrong side of work), *pass CA strand to back between 

needles and purl next MC st with CA in back; pass CA strand to front 

between needles and purl next MC stitch with CA in front. Continue 

to last st, k1.

3-28: repeat rows 1-2.

29: As row 1.

30: Bo 3sts, continue in purl row weave pattern.

31: K1, ssk, work in pattern to last 3sts, k2tog, k1.

32: Work in weave pattern.

33:-34: As rows 31-32.

35: K1, ssk, work in weave pattern to last st, k1.

36: As row 32.

37-44: As rows 35-36.

Bind off.

Sew shoulder seams.

1: Pick up and knit 126 sts around fronts and back neck.

2: Work in rib.

3: K1, p1, ssk, yo, [(k1, p1)x3, ssk, yo,]x4; work in rib to end.

4-5: Work in rib.

Bind off in rib.

Sleeve.


Pick up and knit 44sts around arm opening.

Work 4 rows rib.

Bind off in rib.

Weave in yarns ends. Sew on buttons. 


Free knitting pattern.

Wednesday, 20 December 2017

DIY Doll Clothes Caddy

Last post I showed you how I made some doll hangers for my dolls. Now I have finally got the clothes caddy painted so can share photos of how we made it with you.

Doll clothes storage


The wood used for the structure is some board from the back of an old wardrobe.

DIY doll storage


The base is 34 cms x 20 cms,
the front and back pieces are 34 cms x 10cms. 
the side pieces are 20 cms at the base and height is 49cms, 
DH drew the shape and cut it out for me. He drilled a hole at the top of the side pieces to push the dowel in. 

We glued it together with white craft glue and sandpapered it.

Doll storage caddy


Diy doll caddy


Just checking it is the right size before painting!


Diy storage

I used acrylic spray paint. It took two coats to cover it enough.


Diy 18" doll caddy


For the two knobs on the sides I used two pins from a cork board. I cut off the sharp point and hot glued them to the sides. 

Doll clothes hangers


The letters were from a box I bought DD a while ago and were already painted. I decided to leave them as they were. The flowers were also with them.


Handmade doll clothes caddy

An umbrella, a handbag, shoes and boots and some pretty clothes and the doll is all set!
DIY doll clothes caddy


Hanging doll clothes


Gotz dolls


How do you like the results? 

Thursday, 20 October 2016

Cécile Rey Doll makeover


I was very surprised to see an American Girl doll on Italian Ebay. They are rarely on there and usually cost a lot. At 20 euro it was a bargain for me although not in good condition. I just couldn't leave that poor little waif all alone in Rome with the risk she would be thrown out!  So I bid for her and as there were no other offers home she came! I think the poor mottled photo put some people off! 


She is Cécile who is one of the historical dolls I wanted. 


So Spa treatment. Her clothes were washed and hung to dry. I was very pleased that the colours didn't run when I washed her original dress. 


Next her hair. I didn't have any wig shampoo available but used dish soap and fabric conditioner. I have heard that AG salons don't approve this but as the chance that I ever send her for treatment is less than nil, that didn't bother me. 


Wash, rinse and re-wash. Amazing how dirty her hair was! Then a fabric conditioner rinse. It is important to avoid wetting the body or getting water in her eyes which can cause silver-eye or rust, so she was wrapped up in towels. 
Cecile American girl doll


Then the hair. A lot of patience to find the central parting and to carefully detangle. Never pulling! 

I rolled the curls carefully first onto a knitting needle and then rolled them onto a straw and fixed with bobby-pins. Left to dry overnight. 


Today I carefully pulled out the straws, tied her hair with two white ribbons and she was ready to be dressed in her clean clothes and new boots! 

She seems happy to join my clan here!


American Girl Cecile

Doll hair recurled


A big difference from when she arrived!