Wednesday, 21 February 2018

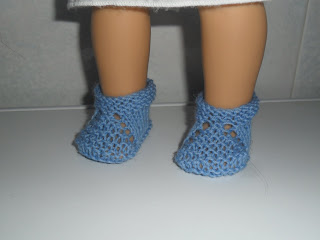
Free 18" doll slippers knitting pattern


An easy  knitting pattern for 18" dolls


Free knitting pattern


Notions:

Sport weight yarn.

Needles: US 3/3mm. (or those you need to obtain gauge)

Darning needle.

Gauge: 6sts x8 rows = 1 inch. In stockinette.

Abbreviations:

Co: cast on.

Bo: bind off.

K: knit

P: purl

St-stitch: Sts- stitches

K2 tog: Knit two stitches together as one stitch.

K2togtbl: Knit two stitches together through back loop.

Ssk: Slip, slip, knit, slip 2 stitches and knit them together.

Yo: yarn over


Free doll knitting pattern


Co 22sts.

1-5: Knit.

6: K10, yo, k2, yo, k10.

7: P10, k4, p10.

8: K10, yo, k4, yo, k10.

9: P10, k6, p10.

10: K10, yo, k6, yo, k10.

11: P10, k8, p10.

12: K10, yo, k8, yo, k10.

13: P10, k10, p10.

14: K10, yo, k10, yo, k10.

15-17: K32.

18: K10, k2tog tbl, k8, k2tog, k10.

19: K10, k2tog, k6, k2togtbl, k10.

20: K2tog, k8, k2tog tbl, k4, k2tog, k8, k2tog.

21: K2tog, k7, k2tog tbl, k2, k2tog, k7, k2tog.

Bind off and sew seams.


Free knitting pattern


Saturday, 27 January 2018

Free knitting pattern for18" Doll Hat and Scarf


Doll hat and scarf knitting pattern


Doll hat and scarf.


50g Aran weight yarn in main and contrast colour.
3mm needles.
Stitch markers and stitch holder.
4 small buttons.
Darning needle.


Cast on 60 sts.
1-8: *K1 tbl, p1 tbl, repeat from * to end of row.
9: K1, p1 in first st, purl to end of row. (61 sts).
Work 7 rows pattern chart.
Purl one row in main colour.
Work hat body:
1: Knit.
2: Purl.
3-10 : As rows 1-2. (If you want to make the hat longer work more rows here.)
Shape crown:
1: *Ssk, k4; repeat from * to last st, k1.
2: Purl 51.
3: *Ssk, k3; repeat from * to last st, k1.
4: Purl 41.
5: *Ssk, k2; repeat from * to last st, k1.
6: Purl 31.
7: *Ssk, k1; repeat from * to last stitch, k1.
8: Purl 21.
9: *Ssk; repeat from * to last st, k1.
10: Purl 11.
Leaving a short length of yarn to sew seam, break yarn and thread through remaining sts on needle to close, pull tight and sew seam.
Weave in yarn ends.

Scarf.
Knitting pattern free


Cast on 17sts.
1-5: Knit.
6: K3, (Kfb)x11, k3.
7: K3, k1, put 1st on holder at back of work.K3. (11sts on holder)
8: K3, p11, k3.
9: Knit.
10: K3, p11, k3.
11: K3, work 9 sts from chart, k4.
12: K3, p1. Chart. K3.
13-16: As rows 11-12.
17: As row 11.
18: K3, p11, k3.
19: Knit.
20: K3, p11, k3.
21-24: Knit
25: K3, bind off 11sts, k3.
Using an extra needle start knitting on the sts from the holder.
8: Purl.
9: Knit.
10-25: As rows 8-9.
Start knitting on sts left on needle:
26: K3, p11 (from other needle) k3.
27: K17.
28: K3, p11, k3.
Continue working rows 27-28 to half of desired scarf length. (I knit 100 rows)
Work another identical piece and graft together.
Sew sides of pockets with slip stitch to close.
Weave in yarn ends.

paws stitch pattern


Patricia Renwick © Copyright January 2018.

All rights reserved. You may sell items made from this pattern but not the pattern. Please respect my design rights. 


Wednesday, 17 January 2018

Free knitting pattern for doll wrap


Free knitting pattern


Knitting pattern


Notions:
30g Dk weight yarn


Needles: US 3 / 3 mm. (or those you need to obtain gauge)
Darning needle.
Stitch holder or waste yarn.

Abbreviations:
Co: cast on.
Bo: bind off.
K: knit
P: purl
St-stitch: Sts- stitches


Free knitting pattern


Co 31sts
1: P1, (k5, p1,) x4, k6.
2: P1, knit to end of row.
3- 20: as rows 1-2.
21: P1, k5, p1, k5, p1, (kfb,)x5, p1, k5, p1, k6.
22: P1, k12, (k1, place one stitch on holder,)x5, k13.
The 5sts on holder are used to work the tab separately. They should be held on the front side of work.
23: P1, (k5, p1,) x4, k6.
24: P1, knit to end of row.
25-30: as 23-24.
Place 5sts from holder onto a needle, Join separate yarn and knit 8rows. Start working on main piece again joining tab as follows:

31: P1, k5, p1, k5, p1, (k1st from tab with one from wrap,)x5, p1, k5, p1, k6.
32: P1, knit to end of row.
33-40: As rows 1-2.

Start short row section:
A: P1, k5, p1, k5, p1, k5, p1, k5, p1, turn work, k25. (Just leave the other sts on the needle, no need to wrap.)
B: P1, k5, p1, k5, p1, k5, p1, turn work, k19.
C: P1, k5, p1, k5, p1, turn work, k13.
D: P1, k5, p1, turn work, k7.
E: P1, k5, p1, k5, p1, k5, p1, k5, p1, k6, turn work, p1, k30.
Repeat from row A for a total of 20 repeats.

Start working straight once more:
1: P1, (k5, p1,) x4, k6.
2: P1, knit to end of row.
3-40: as rows 1-2.
Bind off.
Weave in yarn ends.


Free doll wrap pattern


Leg warmers.
Cast on 30 sts.
1-3: K1, p1, to end.
4-7: Knit.
8: Purl.
9-13: Knit.
14: Purl.
15-19: Knit.
20: Purl.
21-23: Knit.
24-26: K1, p1, to end.
Bind off in rib.
Sew sides together to form back seam. Weave in yarn ends.


Patricia Renwick © Copyright January 2018.
All rights reserved. You may sell items made from this pattern but not the pattern. Please respect my design rights. 


Wednesday, 20 December 2017

DIY Doll Clothes Caddy

Last post I showed you how I made some doll hangers for my dolls. Now I have finally got the clothes caddy painted so can share photos of how we made it with you.

Doll clothes storage


The wood used for the structure is some board from the back of an old wardrobe.

DIY doll storage


The base is 34 cms x 20 cms,
the front and back pieces are 34 cms x 10cms. 
the side pieces are 20 cms at the base and height is 49cms, 
DH drew the shape and cut it out for me. He drilled a hole at the top of the side pieces to push the dowel in. 

We glued it together with white craft glue and sandpapered it.

Doll storage caddy


Diy doll caddy


Just checking it is the right size before painting!


Diy storage

I used acrylic spray paint. It took two coats to cover it enough.


Diy 18" doll caddy


For the two knobs on the sides I used two pins from a cork board. I cut off the sharp point and hot glued them to the sides. 

Doll clothes hangers


The letters were from a box I bought DD a while ago and were already painted. I decided to leave them as they were. The flowers were also with them.


Handmade doll clothes caddy

An umbrella, a handbag, shoes and boots and some pretty clothes and the doll is all set!
DIY doll clothes caddy


Hanging doll clothes


Gotz dolls


How do you like the results? 

Friday, 15 December 2017

Diy Doll Clothes Hangers

I have been busy making some doll clothes hangers. It is expensive for me to buy them online here so diy it is! 

Craft stick hangers


I saw various images online which used craft sticks with hot glue. I decided to use some white vinylic craft glue instead, it is slower drying but gives a good result. 

 For each hanger you need:
3 craft sticks. (I used some  6.7"-17cms long (tongue depressor size).
1 cup hook ( I used a 1" size. The screw part was almost 1/2" long) 
white craft glue.


Diy doll clothes hangers


Homemade hangers


Something to cut the sticks with. Sharp scissors will do, I used a small saw.
Sandpaper.
Acrylic paint.

Mark the center of the stick. Cut away a small amount the size of the screw. 


Doll clothes hangers


Glue the two pieces to one stick. Place the cupscrew in the middle and glue. Put the top stick in place and leave to dry. I used pegs to hold the "sandwich" together. 

Diy hangers

Diy hangers


Doll clothes hangers


When it is dry lightly sandpaper the hanger and then paint. I used two coats of paint. Add a decoration if liked. 

Craft stick hanger

homemade hangers


Doll hanger


Craft stick hangers


18" doll hangers


Doll hangers

Doll hangers


I am busy now making a clothes caddy to hold the clothes and accessories. You can see it in the photo. It still needs finishing and painting but already works! 

More about that next time!


Clothes caddy

storage

Doll hangers

What do you think of these? Like them? 

Sunday, 3 December 2017

Kirsten's Hap Shawl


Free doll shawl knitting  pattern.


Free knitting pattern


Doll knitting pattern


Aran or worsted weight yarn. About 30g.
3.5mm needles.
Gauge is not really important.

Abbreviations: 


Bo: bind off.
K: knit
P: purl
St-stitch: Sts- stitches
K2 tog: Knit two stitches together as one stitch.
Yo: yarn over


Co 126sts + 2 edge sts.
Knit 2 rows.
1: Knit.
2: K1, purl to last stitch, k1.
3: K1,*k2togx3; (yo, k1)x6; k2togx3; repeat from * to last st, k1.
4: Knit.
Repeat rows 1-4for a total of 4 times.
Start shaping:
1: *K3, k2tog; repeat from * to last 3sts, k3. (103sts)
2-4: Knit.
5: *K3, k2tog; repeat from * to last 3sts, k3.(83sts)
6-8: Knit.
9: *K3, k2tog; repeat from * to last 3sts, k3. (67sts)
10-12: Knit.
13: *K2tog, k3; repeat from * to last 2sts; k2tog (53sts)
14: Knit.
15: *K3, k2tog; repeat from * to last 3sts; k3. (43sts)
16: Knit.
17: K3, k2tog; repeat from * to last 3sts, k3. (35sts)
18: Knit.
19: K1, (K2tog) x17.(18sts)
20: Knit.
21: K1, (k2tog)x8 k1.(10sts)
22: Knit.
23: K2togx5.(5sts)
24: Knit.
25: K2tog, k1, k2tog.(3sts)
26: K3tog. Bo.
Weave in yarn ends.


18 inch doll pattern


18 inch doll


Hope you enjoy it!

Thursday, 2 November 2017

Olive Picking Hat

Olive harvest time. 

Olive harvest

My DH requested another hat. Driving the "monster" which shakes the Olive trees can be cold work at times. 

Harvesting olives


The olives are changing from green to black. Beautiful.

Ripening olives


Olive tree

I decided to add the very simple knitting "pattern" on here so I remember it.
My Mil asked me to show her it so she can make one for my Bil. (Mil has started knitting again.)

Olive Picking Hat.
I used Fingering weight yarn used double. Size 4mm (US 6) needles.
Cast on 96sts. 
Knit K2, p2 rib for 70 rows. 

Start decreases:
1: K2, p2 tog; repeat to end of row. (72sts) 
2: K1, p2; repeat to end of row. 
3: K2tog, p1; repeat to end of row. (48sts) 
4: K1, p1,across.
5: K2tog across. 24sts 
6: P2tog across. 12sts. 
Thread yarn through remaining sts, (I do that twice), sew seam.


Very quick and easy, made in an afternoon.

Hat pattern

 Wood is being stashed for winter fires. 

Wood for winter


My Black Cat as usual is busy controlling everything is being done correctly!


All is well down in the Olive Groves!