So what have I been doing? Yes you guessed it! Machine embroidery!
I have been busy embroidering a whole load of tea towels I had. Fun just putting simple lettering on them.
Here are a few photos:
I have done over 40 teatowels! A lot have already left the house.
Between doing those and masks I have been very busy. Now I need to catch up with some sewing that is all piled up here!
Have a nice day!
Saturday, 22 August 2020
Thursday, 13 August 2020
Machine Embroidery.
I am continuing my machine embroidery experiments.
An Eagle:
Yesterday I decided to try some appliquè. Just very simple.
I took some blue fabric and then some white on top. I stabilized the blue with tear away stabilizer. I basted the white at the corners floating on the frame. I didn't use any glue. I don't have any yet and to be honest I am scared of getting my frames and machine sticky. I keep seeing FB posts asking how to remove the glue!
I chose a simple circle design on my machine and stitched it out.
Then I took the frame off the machine and carefully cut the excess white fabric from the outside of the stitching. I replaced the frame and then did another programmed circle with a satin stitch in the exact same place.
Then I added a simple E in the center. All without altering the position of the hoop design.
It was quite fun and simple enough for me to not worry about spoiling a project.
I have no idea what if anything I will use it for but another practice piece is done. Lol!
It is lovely to be trying out "new to me" things. Even cross stitch!
Bye for now! Happy sewing.
An Eagle:
Yesterday I decided to try some appliquè. Just very simple.
I took some blue fabric and then some white on top. I stabilized the blue with tear away stabilizer. I basted the white at the corners floating on the frame. I didn't use any glue. I don't have any yet and to be honest I am scared of getting my frames and machine sticky. I keep seeing FB posts asking how to remove the glue!
I chose a simple circle design on my machine and stitched it out.
Then I took the frame off the machine and carefully cut the excess white fabric from the outside of the stitching. I replaced the frame and then did another programmed circle with a satin stitch in the exact same place.
Then I added a simple E in the center. All without altering the position of the hoop design.
It was quite fun and simple enough for me to not worry about spoiling a project.
I have no idea what if anything I will use it for but another practice piece is done. Lol!
It is lovely to be trying out "new to me" things. Even cross stitch!
Bye for now! Happy sewing.
Saturday, 8 August 2020
Machine Embroidery.
Well I have a new love in my life....machine embroidery!
I bought a Brother Innovis F440e embroidery only machine. I already have a good sewing machine.
An embroidery machine is something I have wanted for a long time.
I was very scared in case I didn't manage to learn to use it. There are no local lessons available. Fortunately there are many videos online and I managed to find some with the machine I had ordered.
I also found the instruction book online and read and reread that many times before my machine arrived.
I found that machine embroidery is a whole new world.
Ordinary sewing thread is not used but special 40 weight embroidery thread. There are many brands and different sorts of thread. I ordered some New Brothread. A pack of different colours so I had a starting selection.
Then there is the bobbin thread. My machine takes 90 weight bobbin thread which is very thin and resistent. I ordered pre-wound bobbins which work beautifully so far!
Other machines which are combined sewing and embroidery machines use 60 weight bobbin thread. It is important to check the instruction book with the machine.
After learning that I had to find out all about different stabilizers! The fabric in the hoop needs stabilizing to embroider well. I bought some online and also bought a starter pack with various types to try and a super help it had an instruction booklet for newbies like me!
Everything bought online as there are no local shops who have these things.
As soon as my machine arrived I tried it. I was lucky as it threaded and worked fine first time! I was shaking as I tried it! Lol!
The first thing I wrote was my name!
Then I started slowly working through a mountain of teatowels I have to embroider!
Obviously with Covid-19 still around masks were another must to make:
Now the latest thing I have embroidered were some towels. I found a letter E which fit into the oval on the big towel. For the smaller one I remembered that I can reduce the design size slightly so I thought to try that. It worked! The machine actually automatically recalculated the stitch density as well and number of stitches. It took over 1000 sts less and a minute less to embroider! I was fascinated! Magic! Lol!
So much more to add! But now I am going to go and do some embroidery!
I bought a Brother Innovis F440e embroidery only machine. I already have a good sewing machine.
An embroidery machine is something I have wanted for a long time.
I was very scared in case I didn't manage to learn to use it. There are no local lessons available. Fortunately there are many videos online and I managed to find some with the machine I had ordered.
I also found the instruction book online and read and reread that many times before my machine arrived.
I found that machine embroidery is a whole new world.
Ordinary sewing thread is not used but special 40 weight embroidery thread. There are many brands and different sorts of thread. I ordered some New Brothread. A pack of different colours so I had a starting selection.
Then there is the bobbin thread. My machine takes 90 weight bobbin thread which is very thin and resistent. I ordered pre-wound bobbins which work beautifully so far!
After learning that I had to find out all about different stabilizers! The fabric in the hoop needs stabilizing to embroider well. I bought some online and also bought a starter pack with various types to try and a super help it had an instruction booklet for newbies like me!
Everything bought online as there are no local shops who have these things.
As soon as my machine arrived I tried it. I was lucky as it threaded and worked fine first time! I was shaking as I tried it! Lol!
The first thing I wrote was my name!
Then I started slowly working through a mountain of teatowels I have to embroider!
Obviously with Covid-19 still around masks were another must to make:
Now the latest thing I have embroidered were some towels. I found a letter E which fit into the oval on the big towel. For the smaller one I remembered that I can reduce the design size slightly so I thought to try that. It worked! The machine actually automatically recalculated the stitch density as well and number of stitches. It took over 1000 sts less and a minute less to embroider! I was fascinated! Magic! Lol!
So much more to add! But now I am going to go and do some embroidery!
Thursday, 23 July 2020
Banana Jam
Lol! I just found this post draft from December! With my DH ill at the time I obviously totally forgot to publish it! Anyway a belated recipe and crochet cover!
Ripe bananas.
Half weight of bananas in cane sugar.
Cinamon.
Mash bananas in a pan. Add the cane sugar. Slowly cook stiring frequently for about 10 mins.
Add the cinamon stick.
Spoon into jars and close lids. Cover with clean dry cloths. Leave to cool.
It should seal lid. I do not bother reheating the jars as I use it quickly!
Mini Jam jar covers.
A small amount of sport weight cotton yarn.
Size 3mm crochet hook.
Start using magic loop:
1: 12 sc in loop.
2: 12x 1 dc, 1 ch.
3: 24 sc.
4: 24x 1 dc, 1 ch.
5: 48 sc.
6: 48 dc.
7: 1sc, 1ch, skip one dc, repeat around.
8: 48 sc.
9: 4sc, picot of 3ch; repeat around.
Bind off. Weave in yarn end.
Elizabeth's shawl.
Yellow shawl pattern.
So here is my version of this thing!
Using cobweb weight yarn and size 2mm needles cast on 153sts.
Knit first and last 3sts on all rows for border.
1: K2 *K1, (wf, k2tog tbl)x3, k3, wf, k3, k3tog, k3, wf, repeat from * to last 12 sts, k1, (wf, k2tog tbl)x3, k5.
2: P4, (p2tog tbl, wrn)x3, p2, *p1, wrn, p2, p3tog, p2, wrn, p3, (p2tog tbl, wrn)x3, p2, repeat from * to last 2sts, p2.
3: K2 *K3, (wf, k2tog tbl)x3, k3, wf, k1, k3tog, k1, wf, k2, repeat from * to last 12 sts, k3, (wf, k2tog tbl)x3, k3.
4: P2, (p2tog tbl, wrn)x3, p4, *p3, wrn, p3tog, wrn, p3, (p2tog tbl, wrn)x3, p4, repeat from * to last 2sts, p2.
5: K2 *K3, (k2tog,wf)x3, k1, wf, k3, k3tog, k3, wf, repeat from * to last 12 sts, k3, (k2tog, wf)x3, k3.
6: P4, (wrn,p2tog)x3, p2,*p1, wrn, p2, p3tog, p2, wrn, p3 (wrn, p2tog)x3, p2, repeat from * to last 2sts, p2.
7: K2 *K1, (k2tog,wf)x3, k5, wf, k1, k3tog, k1, wf, k2, repeat from * to last 12 sts, k1, (k2tog, wf)x3, k5.
8: P6(wrn,p2tog)x3, *p3, wrn, p3tog, wrn, p7 (wrn, p2tog)x3; repeat from * to last 2sts, p2.
(There are 7 repeats of 19sts plus 14sts plus 3sts at each side for border= 153sts)
24 rows pattern.
Change to garter stitch and shaping.
1: K79, pm on left hand needle, turn. (You will have sts unworked on this row and the following rows.)
2: (ws): k5, pm on left hand needle, turn. Center 5 sts are now “framed” with st markers.
3: (rs): K to marker, remove marker, k5, pm on left hand needle, turn.
4: (ws): K to marker, remove marker, k5, pm on left hand needle, turn.
Rep Rows 3 – 4 until you have 3 sts on each end of work between needle tip and marker.
Last rs row: K to marker, remove marker, k3.
Last ws row: K to marker, remove marker, k3.)
Bind off all stitches loosely.
Enjoy! Let me know what you think of this!
I found an old note from my Mother while reading old letters. She had written these instructions which are from a Patons and Baldwins Woolcraft magazine it seems. 16th edition she wrote on it.
I am curious to know what the original design was for. The only version I have found online is the 9th which does not have this stitch pattern in it.
I think it is one of the most difficult stitch patterns I have done. It has patterning on both sides with a lot of purl 2 together through back loop! Not my favourite stitch to do but I love the effect. The pattern repeat is 19 with an extra 14sts.
I am using it for a doll shawl border. I can’t imagine making anything big from it.
A Ravelry friend found and sent me a photo from the book. It seems it was from a selection of knitting stitches in the booklet not a pattern.
So here is my version of this thing!
Using cobweb weight yarn and size 2mm needles cast on 153sts.
Knit first and last 3sts on all rows for border.
1: K2 *K1, (wf, k2tog tbl)x3, k3, wf, k3, k3tog, k3, wf, repeat from * to last 12 sts, k1, (wf, k2tog tbl)x3, k5.
2: P4, (p2tog tbl, wrn)x3, p2, *p1, wrn, p2, p3tog, p2, wrn, p3, (p2tog tbl, wrn)x3, p2, repeat from * to last 2sts, p2.
3: K2 *K3, (wf, k2tog tbl)x3, k3, wf, k1, k3tog, k1, wf, k2, repeat from * to last 12 sts, k3, (wf, k2tog tbl)x3, k3.
4: P2, (p2tog tbl, wrn)x3, p4, *p3, wrn, p3tog, wrn, p3, (p2tog tbl, wrn)x3, p4, repeat from * to last 2sts, p2.
5: K2 *K3, (k2tog,wf)x3, k1, wf, k3, k3tog, k3, wf, repeat from * to last 12 sts, k3, (k2tog, wf)x3, k3.
6: P4, (wrn,p2tog)x3, p2,*p1, wrn, p2, p3tog, p2, wrn, p3 (wrn, p2tog)x3, p2, repeat from * to last 2sts, p2.
7: K2 *K1, (k2tog,wf)x3, k5, wf, k1, k3tog, k1, wf, k2, repeat from * to last 12 sts, k1, (k2tog, wf)x3, k5.
8: P6(wrn,p2tog)x3, *p3, wrn, p3tog, wrn, p7 (wrn, p2tog)x3; repeat from * to last 2sts, p2.
(There are 7 repeats of 19sts plus 14sts plus 3sts at each side for border= 153sts)
24 rows pattern.
Change to garter stitch and shaping.
1: K79, pm on left hand needle, turn. (You will have sts unworked on this row and the following rows.)
2: (ws): k5, pm on left hand needle, turn. Center 5 sts are now “framed” with st markers.
3: (rs): K to marker, remove marker, k5, pm on left hand needle, turn.
4: (ws): K to marker, remove marker, k5, pm on left hand needle, turn.
Rep Rows 3 – 4 until you have 3 sts on each end of work between needle tip and marker.
Last rs row: K to marker, remove marker, k3.
Last ws row: K to marker, remove marker, k3.)
Bind off all stitches loosely.
Thursday, 14 November 2019
My Grandfather's clock.
I finally found the full version of the song I always sang to my children and grandchildren:
GRANDFATHER'S CLOCK BY Henry Clay Work
My grandfather's clock was too large for the shelf,
So it stood ninety years on the floor;
It was taller by half than the old man himself,
Though it weighed not a pennyweight more.
It was bought on the morn of the day that he was born,
And was always his treasure and pride;
But it stopped short — never to go again —
When the old man died.
So it stood ninety years on the floor;
It was taller by half than the old man himself,
Though it weighed not a pennyweight more.
It was bought on the morn of the day that he was born,
And was always his treasure and pride;
But it stopped short — never to go again —
When the old man died.
In watching its pendulum swing to and fro,
Many hours had he spent while a boy;
And in childhood and manhood the clock seemed to know
And to share both his grief and his joy.
For it struck twenty-four when he entered at the door,
With a blooming and beautiful bride;
But it stopped short — never to go again —
When the old man died.
Many hours had he spent while a boy;
And in childhood and manhood the clock seemed to know
And to share both his grief and his joy.
For it struck twenty-four when he entered at the door,
With a blooming and beautiful bride;
But it stopped short — never to go again —
When the old man died.
My grandfather said that of those he could hire,
Not a servant so faithful he found;
For it wasted no time, and had but one desire —
At the close of each week to be wound.
And it kept in its place — not a frown upon its face,
And its hands never hung by its side.
But it stopped short — never to go again —
When the old man died.
Not a servant so faithful he found;
For it wasted no time, and had but one desire —
At the close of each week to be wound.
And it kept in its place — not a frown upon its face,
And its hands never hung by its side.
But it stopped short — never to go again —
When the old man died.
It rang an alarm in the dead of the night —
An alarm that for years had been dumb;
And we knew that his spirit was pluming for flight —
That his hour of departure had come.
Still the clock kept the time, with a soft and muffled chime,
As we silently stood by his side;
But it stopped short — never to go again —
When the old man died.
An alarm that for years had been dumb;
And we knew that his spirit was pluming for flight —
That his hour of departure had come.
Still the clock kept the time, with a soft and muffled chime,
As we silently stood by his side;
But it stopped short — never to go again —
When the old man died.
Ninety years without slumbering
(tick, tock, tick, tock),
His life's seconds numbering,
(tick, tock, tick, tock),
It stopped short — never to go again —
When the old man died
(tick, tock, tick, tock),
His life's seconds numbering,
(tick, tock, tick, tock),
It stopped short — never to go again —
When the old man died
Sunday, 22 September 2019
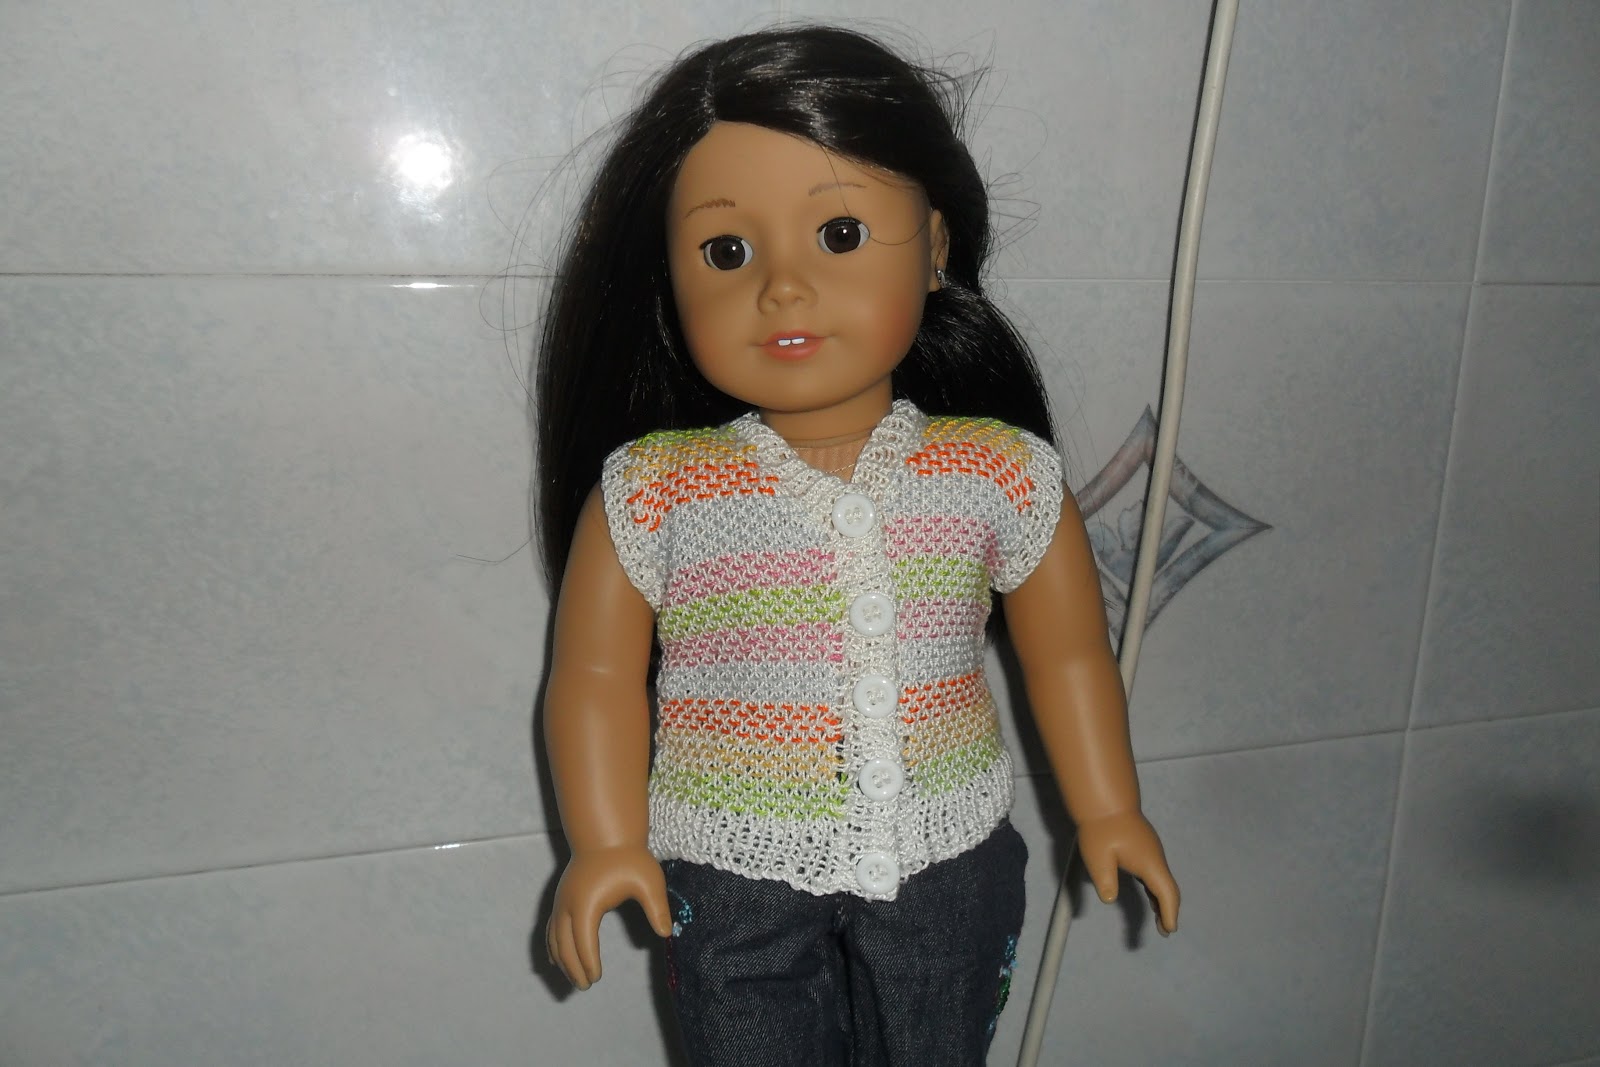
Swedish weave cardi for AG dolls.
Swedish
Weave Cardi:
Notions:
Size
5 weight cotton yarn.
Colour
A.
Colour
B.
Needles:
US 2/2.5
mm.
(or
those you need to obtain gauge)
Darning
needle.
Stitch
markers
or waste yarn.
small
button .
Difficulty: Intermediate.
Gauge:
6
sts
x
7
rows
= 1 inch. In
stockinette
stitch.
Abbreviations
MC:
Main colour yarn.
CA:
Colour “A” yarn.
Use
different colour contrast yarns as desired or a variegated one
gives a lovely
effect but lots of yarn ends to sew!
Co:
cast on.
Bo:
bind off.
K:
knit
P:
purl
St-stitch:
Sts- stitches
K2
tog: Knit two stitches together as one stitch.
Ssk:
Slip, slip, knit, slip 2 stitches and knit them together.
Yo:
yarn over
kfb:
Knit into front and then back of stitch.
Instructions:
Co
51 sts in MC.
1:
K1, p1; repeat to last st, k1.
2:
P1, k1: repeat to last st, p1.
3-6:
As rows 1-2.
7:
As row 1.
8:
Purl one row.
Start
pattern:
1:
K1, K1, MC, passing CA strand across st at front of work. *pass CA
strand to back between needles and knit next MC st with CA at back;
pass CA strand to front between needles and knit next MC stitch
with CA in front; repeat to last st, k1.
You
are not knitting with CA yarn but weaving it back and forth while
working the MC sts.
2:
K1, p1 MC st and bring CA strand forward to pass in front of purl
stitch (on wrong side of work), *pass CA strand to back between
needles and purl next MC st with CA in back; pass CA strand to front
between needles and purl next MC stitch with CA in front. Continue
to
last st, k1.
You
are weaving CA yarn between the stiches without ever knitting it.
3-28:
repeat rows 1-2. (or to desired length to arms. Changing contrast
colour every 4 rows.
29:
Bo 3 sts, continue in weave pattern being careful to keep the
order correct.
30:
Bo 3sts, work purl row of weave pattern.
31:
K1, ssk, work knit row weave pattern to last 3sts, k2 tog, k1.
32:
K1, work purl row of weave pattern to last stitch, k1.
33:
K1, ssk, work knit row weave pattern to last 3 sts, k2tog,
k1.
34:
As row 32.
35-44: Work in pattern.
Left
Front:
Cast
on 25 sts.
1:
K1, p1; repeat to last st, k1.
2:
P1, k1: repeat to last st, p1.
3-6:
As rows 1-2.
7:
As row 1.
8:
Purl one row.
Start
pattern:
1:
K1, K1, MC, passing CA strand across st at front of work. *pass CA
strand to back between needles and knit next MC st with CA at back;
pass CA strand to front between needles and knit next MC stitch with
CA in front; repeat to last st, k1.
You
are not knitting with CA yarn but weaving it back and forth while
working the MC sts.
2:
K1, p1 MC st and bring CA strand forward to pass in front of purl
stitch (on wrong side of work), *pass CA strand to back between
needles and purl next MC st with CA in back; pass CA strand to front
between needles and purl next MC stitch with CA in front. Continue
to
last st, k1.
3-28:
repeat rows 1-2.
29:
Bo 3 sts, continue in weave pattern being careful to keep the
order
correct.
30:
Work purl row weave pattern.
31:
K1, ssk, work in pattern to last 3sts, k2tog, k1.
32:
As row 30.
33:-34:
As rows 31-32.
35:
Work weave pattern to last 3 sts, k2tog, k1.
36:
As row 30.
37-44:
As rows 35-36.
Bind
off.
Right
Front:
Cast
on 25 sts.
1:
K1, p1; repeat to last st, k1.
2:
P1, k1: repeat to last st, p1.
3-6:
As rows 1-2.
7:
As row 1.
8:
Purl one row.
Start
pattern:
1:
K1, K1, MC, passing CA strand across st at front of work. *pass CA
strand to back between needles and knit next MC st with CA at back;
pass CA strand to front between needles and knit next MC stitch with
CA in front; repeat to last st, k1.
You
are not knitting with CA yarn but weaving it back and forth while
working the MC sts.
2:
K1, p1 MC st and bring CA strand forward to pass in front of purl
stitch (on wrong side of work), *pass CA strand to back between
needles and purl next MC st with CA in back; pass CA strand to front
between needles and purl next MC stitch with CA in front. Continue
to
last st, k1.
3-28:
repeat rows 1-2.
29:
As row 1.
30:
Bo 3sts, continue in purl row weave pattern.
31:
K1, ssk, work in pattern to last 3sts, k2tog, k1.
32:
Work in weave pattern.
33:-34:
As rows 31-32.
35:
K1, ssk, work in weave pattern to last st, k1.
36:
As row 32.
37-44:
As rows 35-36.
Bind
off.
Sew
shoulder seams.
1:
Pick up and knit 126 sts around fronts and back neck.
2:
Work in rib.
3:
K1, p1, ssk, yo, [(k1, p1)x3, ssk, yo,]x4; work in rib to end.
4-5:
Work in rib.
Bind
off in rib.
Sleeve.
Pick
up and knit 44sts around arm opening.
Work
4 rows rib.
Bind
off in rib.
Weave
in yarns ends. Sew on buttons.
Subscribe to:
Posts (Atom)